Monday 29 March 2010

Pincushion Caddy!!!


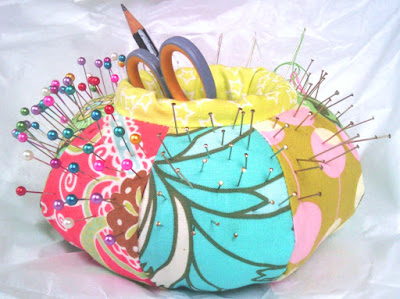
Whilst doing some serious Blog browsing this week, I came across a desginer and blogger Anna Maria Horner. She desgins beauiful fabric and makes lovely clothes and quilts, plus many other things. One of the things I saw on her blog was an AMAZING pin cushion with a hole in the middle of it to store your bits and bobs, such as scissors, thread, pens etc. So after about 2 hours trawling through google and google images I could not find a pattern ANYWHERE!!! I eventually discovered, by going back to Anna Maria's blog and looking at the comments on some of the photos that she had pretty much invented this product and had a pattern for it in one of her books. However, being an English crafter sometimes has it's disadvantages, and currently this means that I can't simply nip out and buy this lovely book, so I set about trying to make one myself.
I had to rope in the brain power of my house-mate for some of this, clearly I didn't pay enough attention in Math' class and she did!!! Having worked out complicated things such as the circumference of a circle (2πR) (R=radius (middle to edge of circle), I could then set about creating this.

My 1st attempt wasn't great, I made a 10cm diameter circle and used 15cm long side pieces, the result being a rather short and VERY fat Caddy. Once I had made one, I didn't want to make another practice one, so I was brave and started cutting out my chosen fabric. Almost all of it, bar a few pieces, is Amy Butler, bought on my last trip to America. This 2nd attempt used an 8cm circle, with 10cm long side panels. I also needed something to hold the internal 'walls' up against al the padding needed to hold the shape, and I happened across a Pringle tube being only slightly too small...I padded it out a bit with wadding etc and it seems to have done the trick. It provides much stronger support than I would have been able to achieve with anything classically designed for fabric.

Bottom of the pincushion, had to be hand sewn, but came out ok.

It was ALOT of work for a pincushion, but it is rather beautiful and hopefully will last me a long time. What do you think? I would love to have your comments...
Next project is going to be another mobile, this time a Space theme, using some AMAZING 'Glow in the Dark' thread I bought recently!!!
Inside the hole in the middle.
Monday 22 March 2010

Mini Crafts Cont...


Well it's been a while and I have been pretty hectic with work and life etc...(if I'm honest mainly work) whilst I have been making a few things, I am yet to start a new 'big' project...however I thought I would post a few things I made quickly using the selvage edge flowers I made last month.
These photo frames were bought AGES ago at the good and faithful, blue and yellow, Swedish shop...I'll leave you to guess which one... All I did was simply embellished them with 2 of the flowers...good old UHU comes in very handy. This is a bit of a cheat craft, but I thought I would show you some of my ideas of how you can use them.

This second idea requires maybe a bit more skill then just sticking...I needed to make some cards for a few family and friends, so using the new sewing machine, I sewed on a felt leaf and stem using green thread and then gluing on a flower. Really simple but sooo effective and everyone has loved them, so far they have been used as Congratulations, Birthday, Thank you and Mother day cards!!! very verisitile, I think you will agree!!! Although, maybe not for the man in your life!!!

I will crack on with a bigger project soon and post up in a few days...Thanks for reading!!! Bedtime for me now!!!

Thursday 11 March 2010

2nd Cushion Cover

After I made the Scrap Cushion back in February, I thought it looked a little lonely so decided to make another one to go on the sofa too... and here is the finished article...It doesn't match, but I thought that keeping the theme the same, (scraps of fabric, appliquéd on) with the same base cushion cover it would look roughly like they were meant to go together.

The middle "flower" of blue, with cream with small blue flowers is actually something my Mum started years ago, I think we are talking before I was born, so a good 26....I thought it was about time it saw the light and now it is useful too!!!

Some of the better blanket stitch, by the end of the pillow, I was losing the will to live, I don't think I will ever be a dedicated embroiderer as I am FAR too impatient!!! Maybe next-time I can work out a way to use the machine to embroider....
So there it is, I hope you like it, please keep voting for me in the Little Blog Awards, I'm currently 3rd, would love to hold that place or climb higher. More crafts coming up later in the week, also going to a friends tonight to craft with her and her kids, should be great!!!

Tuesday 9 March 2010

Secret Quilt Project Now Unveiled!!!


Now I started this quilt, before I had even bought my new sewing machine, but wanted to wait until my sewing machine was here and in use before starting this quilt. The new machine made it sooooo much easier to quilt, the pieces were much easier to sew together and the quilting over the top was also really quick and simple!!!

All the pieces laid out!!!

I was totally marvelled by the amazing-ness of my new sewing machine and how well the pieces match up!!!

The final quilt, with binding sewn on!!!

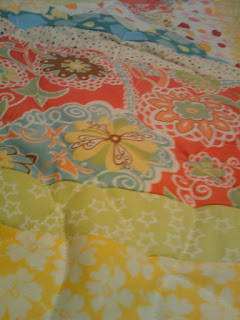
Quilt detail!!!

All wrapped up and ready to give.
The baby is due in the next few weeks and so hopefully I will get a few shots of the little one all snuggled up!!!

Monday 8 March 2010

Little Blog Awards!!!

I have the opportunity to win a Little Blog Award from Dorset Cereal.
Please vote for me below (annoyingly they have spelt the blog wrong, I am trying to get it fixed!!!) For your efforts you get entered into a prize draw too!!!
Thanks so much in advance!!!


Dorset Cereals little awards

Thursday 4 March 2010

Banana Muffins!!!


Another Yummy Blog for today...I have been crafting, but you'll have to wait until I have given it to it's new owner before I can show you up here!!!

So today it is Lovely Banana Muffins!!!

Preheat oven to 180C.
1/2 Cup of Marg/butter
1/2 Cup of sugar
2 Cups of self raising flour (or 2 cups plain flour and 1 tsp of baking powder)
1 Cup of milk
1 Tsp of vanilla essence/extract
2 Eggs
1 Tsp of bicarbonate of soda
1 1/2 - 2 Cups of mashed banana (about 3 large very ripe bananas)
Optional 1 tsp of cinnamon

1 - Cream together the butter/marg and sugar in a large bowl.
2 - Add in the eggs and combine
3 - Add in the vanilla and cinnamon if your are using it
4 - Mix in the mashed banana, large pieces are kinda nice (they weirdly go purple once they are cooked!!!)
5 - Put the bicarbonate of soda in the milk and stir to dissolve the soda.
6 - Sift in the flour a little at a time alternating with the milk/soda, mixing as you go.
7 - Fill Muffin cases about 2/3 full and cook for around 10-13 mins
(the same mix can be used for a banana cake using a loaf tin and cooking for around 30-40 mins, checking that it isn't burning, check it is cooked by using a skewer in the center. As it is such a wet mix, it can take quite a while to cook, if it beginning to burn, put some foil on the top to protect the cake!!!)
8 - Enjoy!!!